Tuesday, October 22, 2019

Taking NO Chances

We left Reedville bright and early this morning with only one goal- to find a spot further south to ride out the predicted bad weather. We are now in the Piankatank River with 17 other boats who must have had the same thought. It's a large cove back here, so we are spread out. The wind is rising, and we getting some wave action back here. The rain has also started.

Meanwhile, repairing your boat in exotic locations continues. Today, the water pump got replaced. It resisted, but we were triumphant after a short battle.

Because I am blogging on my phone, I can't easily place the pictures. So, I will tell you that I have one from this cove and one of the dreaded Volvo box- a sign that we carry spares just in case. Today, that was a good thing.

Monday, October 21, 2019

Today was a great day to be a sailboat

Our morning started out gray, but the sun soon came out. Yay! We left Solomons Island, and we headed south with really nice weather.  Terry decided to pull out the Spinnaker. We had a beautiful run down the bay.

As usual,  though,  the winds died off in the early afternoon. We motored the rest of the way to Reedville. The collage picture shows you the view from our anchorage. Tonight, the water is like glass. The weather man is not promising this for tomorrow. Instead, rain is supposed to move in again. Hopefully, we will be somewhere comfortable when that starts. I'll let you know.

Sunday, October 20, 2019

It Was A Great Day- If You Were A Duck

We left our raft up midmorning heading south. But it rained. And rained. And rained even more. And the waves were merrily playing. So we rocked and rolled. All the way to Solomons. 

Once here, the rainy evening got better for us. We were invited to the home of a couple who also have a Leopard catamaran. They picked us up at the rainy docks. They fed us really great chili and cornbread. For dessert, they offered Klondike bars. It was a lovely evening enjoying tasty food and great conversation. 

Tomorrow, we head south again. Terry and Mike are busy planning a route that puts us somewhere pleasant for Tuesday- when another round of stormy weather is expected. 

Meanwhile- I forgot to mention that my dessert offering was a big hit at the raft up. So, I thought I might share it with you. I thought I was buying figs, but I picked up a bag of dates by mistake. What to do....what to do. Well, I just happened to have some almond paste. So, I split the dates, filled each half with almond paste,  and topped each one with a dry roasted unsalted almond. It was the perfect little sweet treat. They were gobbled up- no leftovers! We'll be serving that recipe again! Yum!

Where's My Umbrella?

Yesterday, we motored out of St. Michael's to Drum Cove- the rendezvous point for the raft up with Back Creek Yacht Club. One of their members is quite the chef. He had prepared dinner for everyone. The main course was boneless chicken legs stuffed with homemade sausage and wrapped with bacon. That was accompanied by fresh green beans and roasted red potatoes. 

The sausage was a mix of veal and pork with fresh herbs AND orange zest. Oops. No chicken for Gee. The wrapped in bacon part turned off Peggy. We chose not to be adventurous. Mike and Terry enjoyed the meal and the company.

Today, it's rainy. The chef is supposedly making crepes with brandied apples. Peggy and Gee will be holding back again. 

After breakfast, we will start south.

Friday, October 18, 2019

Docked in St. Michaels

After a great day with lots of sailing, we are docked at the Chesapeake Bay Maritime Museum. We did our usual- pull up, spin around, and dock. No fuss. No muss. And one impressed dock hand. Great way to end our day on the bay.

On Our Way

Terry is at the helm. We have left the dock. After several years, we are on our way south again. 

Monday, December 10, 2018

Bottom Work: Propspeed and WestMarine PCA Gold

We have traditionally used Trilux 33 non-copper based anti-fouling paint on the saildrive and props. The performance on both has been ok, but not great. The saildrive typically starts growing stuff after a few months of warm water. The props have typically been similar, needing the growth scraped off once or twice during the Chesapeake boating season. The bottom paint has been West Marine CPP, which is an annual ablative paint. It works reasonably well, with only a few barnacles to scrape off on each haul-out.

Overall Bottom - Some Barnacles
Two years ago we installed Flexofold props. While doing the installation, we looked at other boats in the boat yard. Quite a number of big boats used Propspeed and they typically had little or no growth on the props. Propspeed works by making the surface too slick for the growth to get much adhesion. Based on the condition of other props, we decided to give it a try. The first thing we had to do was to get past the sticker shock of the product. But we decided that we were going to try for two years in the water, making it easier to purchase.

The results speak for themselves. Here are some pictures from our haulout in October, 2018, following two years in the water. We cleaned the bottom once during the period. More frequent cleanings may reduced the amount of growth that collected.

We used the same anti-fouling that we had always used before on the saildrives. Sure enough, they had a thick coating of marine growth. The comparison between the props and the saildrives is pretty remarkable.

Starboard Prop with Helical Rope Mark
The props looked the best. There is a helical strip of growth on the stbd prop, which looked like abrasion from a rope wrap. Sure enough, there was a piece of line stuck between the saildrive and the prop. LUX has sat most of the past year due to family events. Propspeed likes to have good water flow to help dislodge the growth and we were not able to provide the appropriate level of activity. Even still, the props and hubs look remarkably clean, relative to what we’ve seen with anti-fouling paint. We had noticed a slight reduction in boat speed, which may be due to a few barnacles and those that attached to the hull.

The growth on the props was easy to remove, except where the abrasion from the rope had removed the Propspeed coating. We only needed to push the barnacles off the Propspeed. 
Port Prop - Note Barnacles on Saildrive

This year we are using Propspeed again and are extending the use to the saildrives too. The saildrives had been coated with epoxy, so we applied a coat of West epoxy over the existing epoxy. There were some places where the aluminum saildrive was exposed, so we used a neat procedure of wet sanding through the epoxy before it cures. The next day we sanded the cured epoxy.

The final step was applying Propspeed to the props. Oceanmax instructions say to apply just the finish coat on epoxy, which is what we have on the saildrives.

We increased the amount of Propspeed that we purchased, but found that the 500ml kit was almost twice what we needed.

We switched bottom paint this year, going with West Marine PCA Gold, which is supposed to be a basic multi-year paint. It took nearly 3 gallons to cover the bottom. It will be interesting to see how well it holds over the next two to three years.
Applying Propspeed

In the last picture, take note of the number of jack stands supporting LUX. We have hauled out at Jabins Yacht Yard for the last several haul-outs. This time they described a catamaran that they had hauled and blocked using stacks of blocks under the hulls and jack stands at the ends. The hulls split along the center line, making them very afraid of using the Leopard-recommended blocking. (I suspect that they paid for the repair and I doubt that it was a Leopard catamaran.) The result is that they used seven pairs of jackstands on each hull. And even though it wasn't our problem, there was an additional charge for the extra blocking.

Update: July 2021
We've been using PropSpeed on our FlexoFold props for the last two haulouts. The first was in 2016 when we initially installed the new props. We reported the results in 2018 above.

During the 2018 haulout we coated the saildrives with the topcoat only as we were unsure about the undercoat on aluminum. The results were great in July 2021. Yes, three years - last year was the lost year and we didn't haul Lux as we normally do.

Barnacles on the saildrives came right off. The topcoat on the saildrives looks good and is shiny. We plan to roughen the surface with sandpaper and reapply the top coat to the saildrives.

The props showed some erosion of the PropSpeed after the 3 year interval, but still had much fewer barnacles than any time in the past when we've used bottom paint of any sort. The barnacles that existed were easily removed with a cloth - they just don't stick to the stuff. We were tempted by the lower price and larger quantity to try the PropGlide product, but think that we'll stick with what we know works.

We were also happy with the performance of the West Marine PCA Gold bottom paint. It didn't work well on the rudders, which we think was due to erosion of all the paint, perhaps from the water flow from the props. The rest of the hull had some soft growth and small barnacles in some places. We've definitely seen much worse. A more regular program of diving and cleaning may be the answer. We had the bottom cleaned about once a year. Lux was in Delegal Creek, Georgia for the winter of 2019-2020 and was in the Chesapeake the remainder of the time. We will use PCA Gold again this year.

We also note that Jabins Yacht Yard now uses foam padding between the support blocks and the hull. We positioned blocks per the owner's manual with additional bow and stern jack stands.


Monday, August 27, 2018

Lithium Battery Engineering Articles

I've read a fair amount of the articles on the web (forums and blogs) about Lithium battery installations. The best of the best are the following:

http://nordkyndesign.com/category/marine-engineering/electrical/lithium-battery-systems/


https://www.entropypool.de/engineering/

https://marinehowto.com/lifepo4-batteries-on-boats/

In addition, you will find some very long threads on various boating forums. Read them carefully as there are a lot of opinions among a few good facts. The above articles are a much more succinct source of the relevant facts.

The design of a good Lithium battery bank with monitoring circuits, etc., is not for anyone who isn't comfortable with electricity and electronics. There are a lot of things to get right. The articles above will provide the foundation material for getting things right.

If you're not of the mind of an electrical engineer, I recommend going to one of the commercial Lithium battery companies for your system. The short list I give out is Victron (I happen to like their other products too), MasterVolt, and Relion. Yes, there are other good companies, but these are the ones I can regularly remember. Their products are expensive, but are engineered for installation by the typical boatyard or an adept boat owner. Even with their products, it is worth reading over the above articles so you're generally aware of the issues (like overheating alternators or a battery that disconnects itself due to over voltage) so you can discuss them with your vendor of choice.

  -Terry

Monday, February 6, 2017

The Case of the Cracked Flywheel Housing

Damaged Engine Mount (Rubber bushing)
In late 2015, we were on LUX, heading down the ICW to south Georgia where we were leaving LUX for a few months. We had just made it into South Carolina and Gee reported a new grinding type sound from the port engine (behind her bunk) when under way. Sure enough, it was distinctly different than the sound from the port engine. We had made it to Georgetown, SC by this time. We lucked out - a diver was working on zincs on another boat on the dock, so we were able to get him to check out the saildrives. He reported that the port drive was loose. A little investigation in the engine compartment with a light showed the engine mount on the saildrive seemed to be heavily worn and should be replaced. (See Damaged Engine Mount)

We called around and found one that could be shipped to Charleston, SC, where we planned to replace it. We motored the rest of the way to Charleston using the starboard engine except for docking. Of course, shipping parts to any port is fraught with risk and this was no different. It took all of the first day in Charleston to get the part and make it back to LUX.
Next, we started looking at removing the existing engine mount. Imagine our surprise upon looking closer and finding a crack in the flywheel housing. A closer examination showed that the crack was all the way around the perimeter of the saidrive’s connection to the flywheel housing.

Cracked Housing - Outboard
Our reaction was a bit stronger than “Oh No!” Our immediate thought was that it was going to require professional help and cost several thousand dollars to fix. Time to break out the phone and start making calls. The soonest we could be helped was the following week. Not only would it cost a bunch to make the repair, we’d be stuck in Charleston at an expensive marina. It was time to go to dinner and think about the situation. 

Think, think, think

How did it happen? The last charter in the BVIs was a disaster. LUX drug anchor and ran aground. Damage was fairly minimal, but the port prop took a few hits and had to be straightened. We think that a crack started then and four years of working back and forth extended it around the saildrive.

Cracked Housing - Inboard
It's Cracked All the Way Around!
Our port engine wasn’t totally out of commission. It could be used for docking as long as we didn’t need much power. We had made it from Georgetown to Charleston on one engine. Waiting in Charleston for repairs didn’t seem useful. There were other service companies in Georgia. So we decided to continue south, primarily on one engine.

As we made our way south, we thought about the problem, looked the engine over, and studied the parts diagrams. We could just slide the engine back about four inches and replace the cracked housing. Hmmm. Really? We had many hours to think on it. Checking eBay, we found a used flywheel housing that was much less than a new housing. We ordered it with shipment to our destination marina in Georgia. 

We thought about how to support the engine so we could decouple it from the saildrive and replace the flywheel housing.  We started collecting parts we thought would be of use. The end result was that we decided that we could to the job.

Doing the Job

Supporting the Engine
Mike orchestrated the repair, using an oak board, lines, and turning blocks to support the engine. It took most of the day to replace the housing. The old housing was indeed cracked all the way around the saildrive mount.

The new housing arrived in great shape and was soon installed and the engine coupled back to the saildrive.
Broken Flywheel Housing


New Flywheel Housing


The saildrive engine mount still had to be replaced. Just getting the old engine mount bushing out was a problem. It wouldn’t move. We had rented a car so we headed off to Tractor Supply, the source for all sorts of big parts. We returned with a 2-1/8 inch socket, a big wheel puller, all-thread rod, big washers, and a few other parts.
These parts did the job, allowing us to pull the old bushing and install the new bushing. We had to use heat on the saildrive mount to get the old bushing out and the new busing in (note the heatgun in the photo of installing the new bushing).


We were back to two fully functioning engines without having to spend too much time or money.
Removing the Engine Mount Bushing
Installing the New Engine Mount Bushing

Sunday, February 5, 2017

FlexoFold Props

Original Fixed Blade Props
LUX has had the stock two-blade fixed props that are outfitted on the charter fleet.
We had spent some time buddy boating with Dave on 5thQuarter and he was able to make better speeds at lower RPM, even though he had the 30HP Volvo MD2030 engines (LUX has the 40HP MD2040 engines). We recorded measurements of the performance at different points in time, shown in the table below, including 5Q’s performance, just for reference.
It was clear that Flexofold props were better. But they make a two blade prop and a three blade prop. Which one should we get?


Description (both engines running) RPM Speed (kn)
Before 2014 Haulout 2500 6.5
2800 7.1
After 2014 Haulout 2500 6.9

2800 7.3
Three months after 2015 Haulout 2500 7.1

2800 7.4
After 2016 Haulout (Flexofold props) 2500 7.4

2800 7.7

3000 7.9

3400 8.3
5th Quarter 2500 7.3

2800 7.6

Flexofold with PropSpeed
We asked Flexofold what they recommended for the MD2040 engines with the 130SR saildrdives (gear ratio 1:2.47). They responded that the three-blade 16x13 props would perform best. We agonized over the decision for a while and queried them about three-blade vs two-blade props, which 5Q and other Leopards we knew had. They told us that the extra blade helps with powering into seas and headwinds. The additional blade also provides better reverse performance. The pair of three blade props was $1000 USD more than the two blade props. We finally decided that the additional power was worth the money and ordered the three blade 16x13 props. They arrived within two weeks, nicely packaged. There was a small nominal charge from the shipper for entry into the US.

We have never had good luck with prop anti-fouling. It always seems to only last half the year. So we decided to try PropSpeed this year. It is an expensive anti-fouling for running gear. It has a tight timeline for application of multiple coats, so we had to be prepared and work quickly. We noted a number of boats being hauled had PropSpeed applied to the running gear and it seemed to be working for them. We’ll see…


We are happy with the performance of the Flexofolds. We can now motor on one engine at the same speed (in flat water) that we previously attained when motoring with two engines (6.6kn @ 2500rpm, 7.3kn @ 2700rpm). The motoring speed with two engines is improved (shown in the table above). Reverse performance seems about as good as with the fixed blade props. We did an informal quick stop test, similar to the one in the Yachting Monthly Folding and feathering propeller test magazine article of March 2015. The Yachting Monthly article reported stopping in 9.5 seconds, or 48 ft. In our test, we were able to go from 6kn to stopped in approximately one boat length (about 40ft). This is quite acceptable to us. Sailing performance also seems better, which we attribute to the folding props. The better motoring performance on one engine is also due to elimination of drag from the idle engine/prop. In summary, we’re quite happy with the Flexofold props.

Compression Ding Repair

Ground Out Ding with First Layer of Fiberglass
Every summer we tackle a list of projects that bring LUX closer to where we want her to be. The good news is that we seem to be getting close to the end of seemingly endless projects. This summer, we tackled a big compression ding on the port side, replaced the saildrive bellows, replaced the vibration dampener in the engines, and installed Flexofold props.

LUX had had a 6 inch diameter compression ding amidships, port. We ignored it last year (2015) as we were upgrading the standing rigging. This year's project started with the big grinder - grinding out the gelcoat and upper layers of fiberglass and feathering it out to a 12 inch diameter area.
Epoxy Workstation on a Walk Board
The fiberglass had delaminated from the underlying end-grain balsa. We drilled a few small holes in the fiberglass that remained. There are many opinions on whether to use epoxy or polyester resin on repairs. Our understanding is that polyester to polyester is only a mechanical bond, so we prefer epoxy, which also has adhesion. The Gougeon Brothers West Epoxy system has a lot of documentation and we’re experienced in using it, so that’s our go-to system for fiberglass repairs. We mixed some epoxy, adding cabosil (silica) to slightly thicken it, and injected it between the fiberglass and the balsa with a small plastic syringe.

Apply Pressure While the Epoxy Cures
The remaining epoxy was thickened and used to apply concentric circle layers of chopped mat and cloth to the surface of the depression. A piece of plastic sheet covered the still wet fiberglass and a squeegee was used to squeeze out the excess epoxy and bubbles. We then pressed a piece of flat foam on top of the plastic sheeting, backed by a piece of plywood. The whole thing was held in place by a set of walk boards.


12 inch Drywall Knife


24 inch Paint Shield


The area around the ding was masked off and the surface scrubbed and sanded to remove the amine blush that the West Epoxy system creates on the surface. The plastic sheet should prevent the formation, but we needed to sand it to create a “tooth” to help bond successive layers of repair. Low density fairing compound (#407) was mixed with epoxy and applied to the sanded surface. We used a 12 inch drywall taping knife to feather out the surface. 
As the surface came up to the same level as the gelcoat, we switched to a 24 inch painting shield to apply epoxy mixed with Microlight sanding filler (#410).

It took several coats of the Microlight epoxy mix to feather the repair to the same level as the gelcoat. We then used a sanding block and a 4-inch pad sander to sand it down slightly below the level of the surrounding gelcoat. The metal kedge of the 24 inch painting shield, bowed so that it followed the curvature of the hull, worked well for showing that the repair surface was slightly below the gelcoat. It helps to use some white tint in the epoxy in the final stages so that the underlying color isn't as dark.

Preval Sprayer Kit
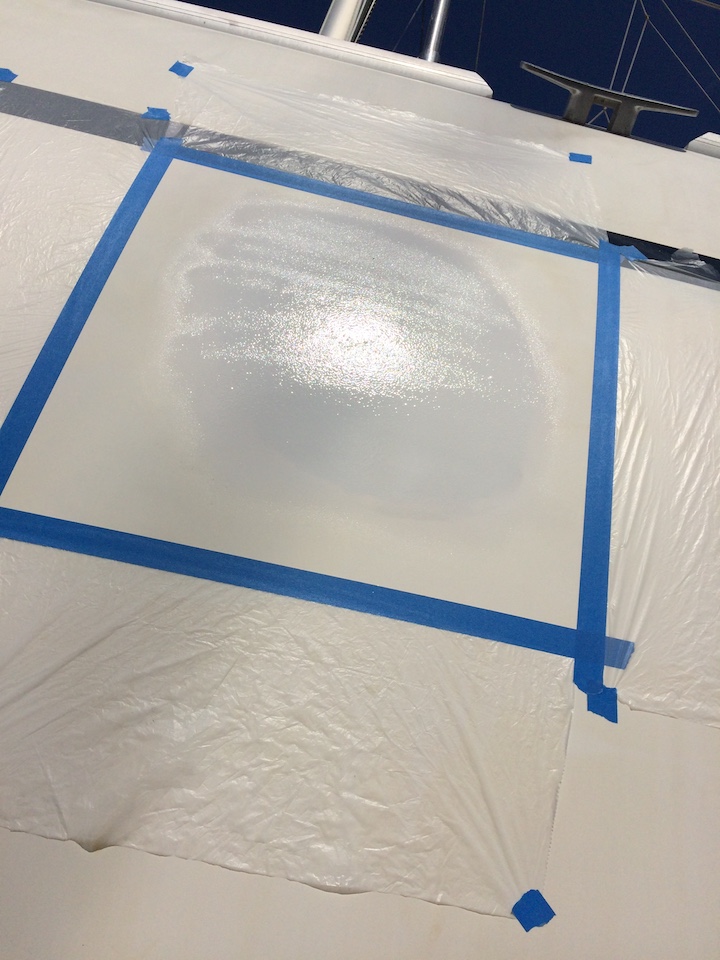
Time for something new: spraying gelcoat. We had heard about using the Preval disposable sprayers for small gelcoat repairs. It is definitely at the low end of the quality scale for spraying gelcoat. The gelcoat was thick, even after thinning as much as we dared. The resulting surface has an orange peel dimple to it, clearly visible in the below picture. We knew that we’d have to sand down the orange peel dimples, so we applied several coats over the course of the afternoon, making a quick trip to the local marine supply store for more Preval sprayers. Only the refill compressed tank and sprayer valve was needed. We mixed the gelcoat in a small cup and sprayed directly from the cup.

Orange Peel Stipple Pattern
We used the finish version of gelcoat, so we didn’t have to spray an air barrier (PVA mold release) on the surface. Color matching was the difficult step. We’ve been slowly gaining experience with gelcoat color matching. The Leopards seem to use a brown tint, which we were not able to replicate using red, yellow, and black. The amount of each of these colors is simply too small to accurately get the right color. We finally found a small tube of brown color in a kit from Jamestown Distributors. A very small dimple of color paste on the end of a bamboo skewer is just about right for mixing with an ounce of white gelcoat. The Leopard interiors require a little additional color paste since they are more of an eggshell color than the topsides.


Ready for Sanding
Careful sanding of the gelcoat was required to remove the orange peel surface effect without getting too thin. We started with 220 grit on a pad sander to take off the high spots. Then it was time to remove the blue tape and plastic sheet and start wet sanding with paper around a wood block. We started at 320 and progressed to 600, then 1200. Patience is required. If you go too fast or too hard, the gelcoat gets thin and you can see the darker filler compound below. Feather it out to the surrounding gelcoat. Then we finished with a compounding wax and a buffer.

The entire process took us about a week, mostly due to waiting for the epoxy to cure. We also had to be careful of warm sun causing the epoxy and gelcoat to cure too quickly.


I didn’t have a final picture. But when I went to get one, I couldn’t find the exact spot. It must be a good repair if I can’t easily find it while looking from the deck.

Saildrive Bellows Replacement

Removing the Engines
LUX has Volvo MD2040 diesel engines with SR130 saildrives. To our knowledge, the bellows that seal out the sea water around the saildrives have never been replaced. The recommended replacement interval is 7 years and we are at 12 years. Next, the vibration dampener in the port engine needed to be replaced, something that didn’t get done when we replaced the cracked flywheel housing. We also had a clicking sound in the starboard engine controls that we’d like to investigate.

It started with removing the engines from their compartments. We’ve been hauling out at Jabin’s Yacht Yard in Annapolis. LUX’s 20’2” beam just fits their 21 ft beam 75 ton lift. They have a good crew and a convenient location for us. We disconnected everything from the engines, taking care to label everything. The lift crew then uses the forklift to hoist the engines out of the boat.

We placed the engines under LUX where we could work on them.
Servicing the Engines


Saildrive on its way home for servicing
The saildrives were removed and taken home to be serviced and prepared for installing the new bellows. The prop shafts and seals were checked and serviced so that they wouldn’t leak. The props have to be removed in order to get the saildrives out. It also helped to have someone below the boat, using a screwdriver to pry the external boot open around the bulge at the lower gear assembly. We also replaced the sea water valves since they were original equipment. They were operating correctly, but we've heard numerous stories about various valves on the Leopards. These were the last valves to be replaced.


We cleaned up the engine compartments. While doing gelcoat, we masked the area around the engine mounts and coated the existing green gelcoat with white gelcoat. We also filled in some of the pits in the old gelcoat that tended to collect oil and gunk.


Damaged Vibration Dampener
The old vibration dampeners were definitely damaged, as seen in this photo. Rubber parts were just lying inside. We've collected them in a small pile to the right of the main part of the dampener in this photo. They're black, so they are hard to see against the black tailgate lining. The metal parts tapping each other was probably the source of the metallic clicking sound that we had been hearing from the starboard engine.

New Vibration Dampener


The new vibration dampeners look very nice.

While we had the engines out, we replaced the oil pans. Salt water on the bottom of the pans over the past 12 years was causing pitting and the last thing we needed was to have one spring a leak.

Everything went back together as planned. All the labeling paid off. There were no left over parts and the engines started right up. The clicking noise in the starboard engine is no longer there, and after seeing the vibration dampener damage, we’re confident that it was the source of the noise.


Tuesday, January 24, 2017

CAPCA: Ten Problems Tips and Tricks for Captains

I did a presentation at the Chesapeake Area Professional Captain's Association titled Ten Problems, Tips, and Tricks for Captains. Over sixty people came out on a cold, windy, drizzly January night to spend some time thinking about boating instead of the weather. We had a great time talking about the set of problems I assembled with the assistance of Art Pine and Priscilla Travis of CAPCA. A PDF of the presentation is available at the link below. It is 23MB, but Google Drive seems to do a great job of compressing it for viewing. There is a video in the original presentation and I've included a link to it on the page where it appears. You might get something from the PDF, but I said a lot during the presentation that isn't in the slides.

  -Terry

Ten Problems, Tips, and Tricks for Captains

Monday, September 5, 2016

Lithium Battery Presentation

We've been happy enough with our Lithium Iron Phosphate (LiFePO4) battery installation that I volunteered to do a presentation at the Annapolis Sail & Power Squadron meeting, Sept 1, 2016. The powerpoint slides may (or may not) be self-explanatory. If you're interested, a PDF of the presentation can be found here:

I later did a revised version of the talk to the Marine Trawler Owner's Association. This version contains a few more details. It is 29.2MB.
Lithium Batteries as a Marine House Bank

  -Terry

Saturday, August 13, 2016

A New Trampoline

The original trampoline on LUX had seen better days. The grommets were pulling out of the material that around the edge and the lines that held the tramp in place were chafing on the grommets and squeaking loudly when we stepped on the tramp. Parts of it had ripped right in front of each of the hatches, which we repaired by adding a small patch piece and threading small line through the holes.
Lagoon Netting Tramp

Lagoon Tramp Edge Detail


We had been looking at other tramps and rather liked the designs that used a bolt rope around the perimeter. A 40 ft Lagoon at one boat yard had a netting tramp that was done this way and we took some photos.

Web Overlap Stitching
Carol ordered replacement tramp material from Manart-Hirsch, a wholesale supplier of boat canvas materials. We decided on the same material that was originally on LUX, a webbing that is 1/4 inch strips on 1/2 inch centers. It doesn’t let water and air through as readily as the netting that we’ve seen on other boats (like the Lagoon). But it feels a lot better under foot or lying on it. If we were sailing in waters where we would have the possibility of green water on the tramp, then we’d have considered the netting.

The material doesn’t come in a width that can do the tramp in one piece, so Carol and Mike thought about how to best couple two pieces together. The final result was to use 3M 5200 to glue the two pieces together, then stitch it. A strip of plastic was laid down first so the adhesive wouldn’t make a mess on our work area. The two pieces were carefully aligned with the 5200 adhesive, then more plastic was put on top. Boards topped with with bricks were used to press the two pieces together. Then we waited several days for the adhesive to set. The adhesive made stitching a lot easier. The Consew industrial sewing machine was loaded with Gortex thread, which doesn’t deteriorate from UV light. This means that we won’t have to restitch it after a few years. Carol stitched each of the seven webs that overlapped (see the red arrows at the top and bottom row of stitching).


Tramp Edging with Stamoid binding
The tramp was folded over along the edge, using an outline we had made from the old tramp. The outline also matched the plans that we found online. The two sides bow slightly in the plans, but there is so little curve that the tramp can be built with straight sides. The edge overlap is covered with Stamoid cloth and several rows of stitching.


Tramp Edge Detail, Top Side
The edging was done much like that of the Lagoon we saw. There was some discussion about what type of bolt rope to use and its diameter, before settling on 3/8 inch three-strand twist. It is easy to splice and would work well for our purpose.

The tramp was tied to the bows and beam with 1/4 inch dacron line. It is important that the stitching have two lines at each corner and in the middle of each side so that if any single line breaks, the tramp integrity keeps crew members aboard.

Completed Tramp


An unexpected benefit is that the tramp is much quieter than with the grommets. It is more stable and less bouncy. This was another great sewing project by Carol.